The article provides a guide on reducing CPU voltage (undervolting) using the Dell G3 3590 as an example. It covers checking BIOS support for undervolting, downgrading BIOS if necessary, determining if the BIOS has enabled undervolting, unlocking the BIOS, and using software like Throttlestop or Intel XTU for undervolting.
✨ Introduction and Summary
✨
This article focuses on how to lower laptop CPU voltage, including steps to downgrade BIOS, unlock BIOS settings using tools like UEFITool and IFR Extractor, disable overclocking lockout and CFG lockout, and use a special USB flash drive to set EFI variables. Also, this article provides some other related information such as enabling the Hyper-V feature.
Summary of key points
Lower CPU voltage reduces heat and extends battery life
Downgrading the BIOS unlocks the BIOS settings.
Overclocking lockout and CFG lockout can be disabled using tools such as UEFITool and IFR Extractor.
The EFI variable can be set using a special USB flash drive.
⚠️
Disclaimer:
Changing voltages or editing BIOS settings not supplied by the laptop manufacturer is risky, so I don't guarantee or warranty that all of this will work for you.
This is just my own way of making Dell G3 3590 A review of the experience of running faster!
📝 Main content
I. Check if your BIOS version supports bucking (if it does then skip the bucking BIOS step)
II. Degradation B IOS to allow undervoltage (Optional, depending on step one )
💡
The latest (1.21.0) BIOS on the official website no longer allows bucking, only downgrading, as does the 1.11.0 version that Windows automatically updates.
1. Turn off automatic BIOS updates
The BIOS downgrade is successful, as soon as you turn off the computer again or reboot, it will update the BIOS to a new version for you, and the previous work is gone. Tap F2 when booting up, enter BIOS. security, turn off Enable UEFI Capsule Firmware Updates, apply, exit and reboot. After that, enter the system.
💡
The intel ME downgrades all fail, but don't affect bucking
2.1 Direct Degradation (Method 1)
Direct download from the official website Version 1.6.0 BIOS The BIOS can be downgraded successfully after reboot.
Download the official Version 1.6.0 BIOS This is an EXE file (with a filename like G3 3590 1.6.0.exe).
Copy it to the root directory of the USB flash drive and rename it BIOS_IMG.rcv, paying attention to the correct file extension.
Shut down and unplug the computer's power cord (power adapter)
hold down ctrl and esc If the power cord (power adapter) is plugged in, wait patiently for it to turn on automatically (⚠️ Do not use the power switch to turn on the computer manually).
Wait for a while, it will enter the BIOS recovery interface, at this time release the ctrl and esc keys.
Select BIOS recovery, OK
Wait patiently for the BIOS flashing to complete, do not turn off the power during the upgrade. It will reboot automatically when the upgrade is finished
III. Determining whether the BIOS has enabled the buck feature
💡
If the BIOS originally supports it (please check how to enable it yourself), this section focuses on how to unlock it yourself by changing the BIOS.
IV. Change the BIOS to unlock itself (optional, depending on the step Three )
in order to Run as administrator Once opened, first perform the Read After the completion of the Backup Just save it at the end of the day.
2. Extracting system settings with UEFITool
With the above BIOS dump, you can now use the UEFITool ( download link ) to search for settings we care about, especially overclocking.
Open the BIOS image. File - Open image file
Search (Ctrl+F) for "Overclocking Lock" on text (not hex mode or GUID)
The search match will be a child part of the file we want to extract. Right-click on the parent file that matches your search (e.g., click on the line with the text "Settings") and click "Extract as is". Save this .ffs file somewhere, we'll need it for the next step!
3. Use IFR Extractor to get a human-readable version of the BIOS settings.
The file we have just extracted contains all the toggle options that the computer's BIOS has, many of which are hidden by Dell by default. We also need another tool to get a human-readable version of these options, the LongSoft version of IFR Extractor ( download link )
Simply open IFR Extractor, point it to the .ffs you extracted in Step 2, and click Extract. It will prompt you to save the .txt version of the file somewhere.
Now you have a nice, human-readable text file with all the possible options you can change. It's time to open it!
4. Finding useful BIOS setup options
⚠️
It is important to note that many of these settings, if improperly enabled or edited, can cause problems such as: bricked computer. (Generally it is possible to pass the Reset BIOS Recovery)
So while there are a lot of cool looking features listed in the BIOS, that doesn't mean they all work.
When you open the IFR extracted text file, you will see the pages and pages of the BIOS setup and the location of these setup variables (variables accessed at a given VarOffset within a given VarStore) in NVRAM.
Overclocking Lock - This option is stored in the VarStore 0x1 inner VarOffset 0x65F . If this variable is set to 0x0 , then locking is disabled. If set to the default 0x1 If it is enabled, then it is enabled.
The overclocking lock not only prevents you from increasing the CPU's operating speed, it also prevents you from changing voltages, including undervoltage.
CFG Lock - This option is stored in the VarStore 0x1 inner VarOffset 0x5C3 . If this variable is set to 0x0 , then locking is disabled. If set to the default 0x1 If it is enabled, then it is enabled.
I'm not sure if you need to disable it to lower the voltage, but I did disable it in case I want to try the Hackintosh route in the future.
By finding VarStoreId: 0x1 can be found VarStore 0x1 (used form a nominal expression) name (of a thing) behavior Setup
We now know everything we need to get to the next step:
The "Overclocking Lock" and "CFG Lock" options are stored in the Setup VarStore.
To disable overclocking lock, we need to set the VarOffset 0x65F set to 0x0 (will) 0x65F Replace VarOffset with the overclocked locked VarOffset you see on your own machine, as it may be different from mine!
To disable CFG Lock, we need to set the VarOffset 0x5C3 set to 0x0 (will) 0x5C3 Replace the VarOffset with the VarOffset of the CFG Lock you see on your own machine, as it may be different from mine!
5. Preparing the EFI USB boot drive
We will prepare a special USB flash drive that will allow us to set the above "lock" variable to 0x0.
here downloading The grubx64.efi file from the v1.0 alpha release.
Obtain (or format) a blank FAT32 USB drive.
Create a folder called EFI. In this EFI folder, create a folder called Boot.
Place the grubx64.efi folder above in the EFI/Boot folder path.
Rename grubx64.efi to bootx64.efi.
6. Disable Secure Boot in BIOS (check for disabling on your own)
7. Start the prepared EFI USB drive
You can access the boot menu and select the flash drive to boot into the modified GRUB terminal.
You should now be able to execute the command "setup_var" to read and edit the settings of interest, which are stored as EFI variables.
💡
Before attempting to modify the value of an EFI variable, you The variables identified above should be checked (overclocking lock and CFG lock) can be read and set to 0x1 as we would expect.
It's always good to test reading variables before writing them!
You can use the setup_var command and the VarStore and VarOffset values associated with the BIOS CFG lock and overclock lock to read their current values: setup_var [VarStore] [VarOffset]
For my device, the following commands return relevant values
setup_var Setup 0x65F setup_var Setup 0x5C3
8. Edit the required EFI variables
After confirming that you can read the CFG Locked and Overclocked Locked EFI variables, you can try changing them to a value of 0x0 to disable them using the setup_var usage:
setup_var [VarStore] [VarOffset] [Value]
For my computer, the following command disabled my overclocking lock and CFG lock:
setup_var Setup 0xDA 0x65F
setup_var Setup 0x3E 0x5C3
IV. Utilization Throttlestop/Intel XTU etc. software for bucking
V. Descending Determine if Throttlestop on your computer is bucking effectively
Open FIVR in the main screen
Ineffective blood pressure reduction is indicated if
The voltage in the upper right corner of the interface shows 0.3799 or does not correspond to the set value (Figure 1)
Adjust the Offset Voltage, if the voltage Offset in the upper right corner does not change (Fig. 2)
Figure 1
Figure 2
VI. Throttlestop Bucking Ineffective Solution Program (optional, depending on step 5 )
1. Disable CPU virtualization in BIOS (optional, theoretically unaffected)
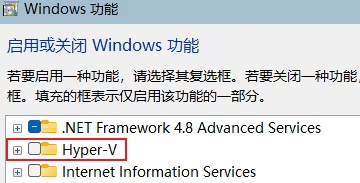
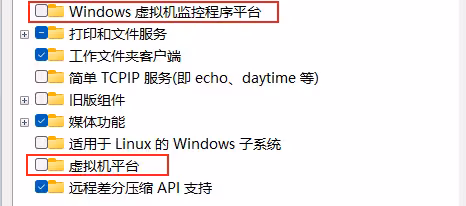
2. Shutting down Hyper-v and virtual machine related services and components
Hyper-v doesn't show up in Windows features on Home Edition systems, add it first.
pushd "%~dp0"
dir /b %SystemRoot%\servicing\Packages\*Hyper-V*.mum >hyper-v.txt
for /f %%i in ('findstr /i . hyper-v.txt 2^>nul') do dism /online /norestart /add-package:"%SystemRoot%\servicing\Packages\%%i"
del hyper-v.txt
Dism /online /enable-feature /featurename:Microsoft-Hyper-V-All /LimitAccess /ALL
Enter the above code into a text file, save it and change the suffix to .cmd If you are running Hyper-v, right-click on it and run it with administrator privileges, wait for it to finish rebooting and then you will see Hyper-v after that.
exist Enabling or Disabling Windows Features in the Control Panel Uncheck the items in the red box in the picture, click Confirm, and reboot!
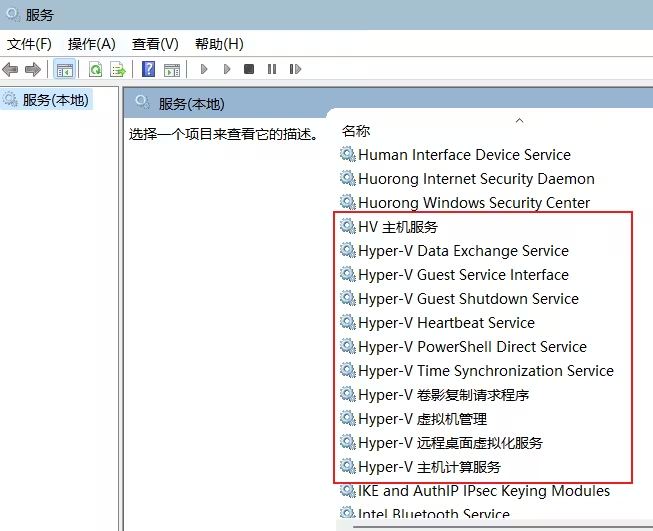
The following turns off Hyper-v related services, deactivates them all, and sets them to disabled (optional).
Open cmd (with administrator privileges) and execute bcdedit /set hypervisorlaunchtype off